



Setting up a USB ELM327 adapter with OBDAI on Windows provides the most stable and reliable connection for OBD2 diagnostics. Unlike Bluetooth adapters that can have range limitations, USB connections offer consistent performance and are perfect for desktop setups or workshop environments.
The USB advantage: Direct wired connection eliminates connectivity issues while providing fast, stable data transfer for professional diagnostics.
Why Choose USB ELM327?
USB ELM327 adapters offer several advantages for Windows users: – Most reliable connection – No wireless interference or range issues – Consistent performance – Stable data transfer rates – Perfect for stationary setups – Ideal for workshop or garage use – No pairing required – Plug and play simplicity
Follow the steps below for the complete USB setup process.
Understanding the CAN Speed Switch
Most USB ELM327 adapters come with a mysterious switch that confuses many users. Here’s what it actually does:
Switch Positions: – Up Position: Standard CAN (11-bit or 29-bit) – Works with most vehicles – Down Position: Medium Speed CAN – Proprietary Ford protocol for older vehicles
For 99% of vehicles, keep the switch in the UP position. This enables standard CAN communication that works with virtually all modern cars.

Step-by-Step Setup Process
Step 1: Prepare the USB Adapter
- Locate the CAN speed switch on your USB ELM327
- Set switch to UP position for standard CAN protocol
- The adapter is now ready for connection
Step 2: Connect to Your Vehicle
- Plug the USB ELM327 into your vehicle’s OBD2 port
- Start your vehicle to power the adapter
- Look for indicator lights showing the adapter is active
Step 3: Connect to Your PC
- Plug the USB cable into your computer
- Windows will automatically install drivers
- The system will create a new COM port for the device
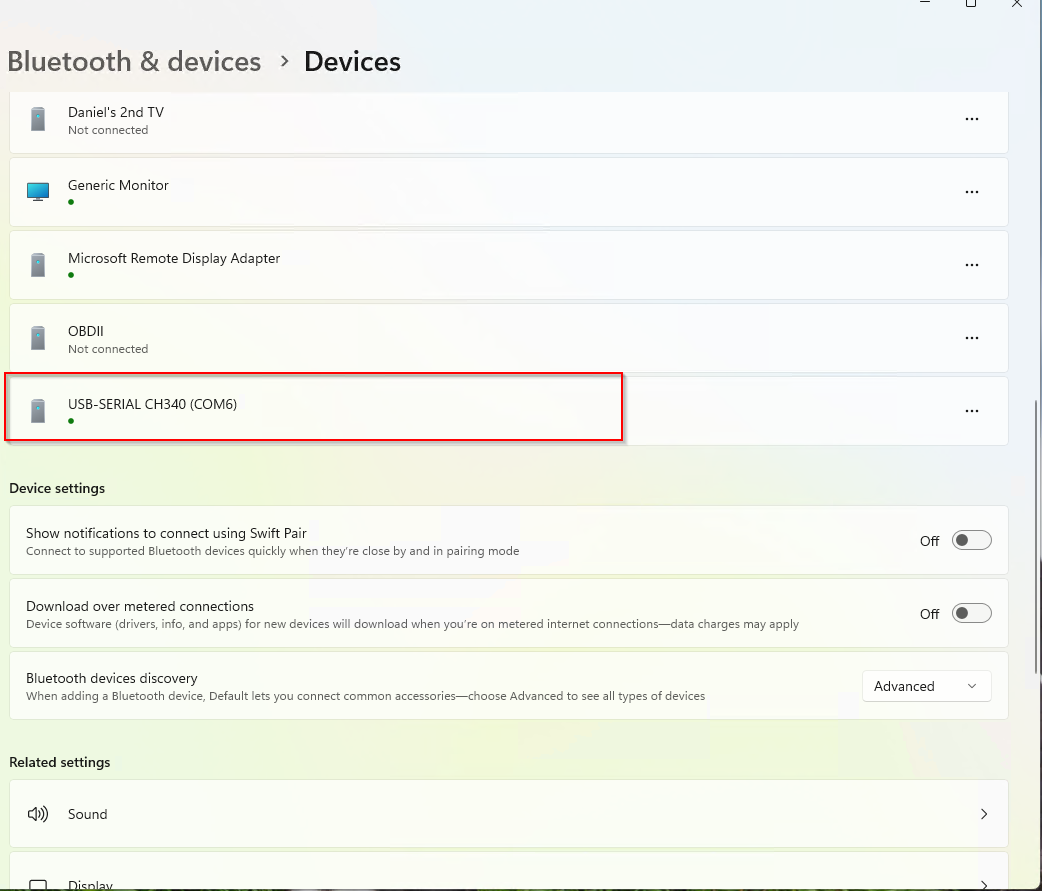
Step 4: Find the COM Port in Device Manager
This is the crucial step for USB setup:
- Right-click Start menu → Select “Device Manager”
- OR type “device” in Start menu → Select “Device Manager”
- Look for “Ports (COM & LPT)” section
- Find the new COM port created (usually COM3, COM4, or COM5)
- Note the COM port number – you’ll need this for OBDAI

Step 5: Configure OBDAI Connection
- Open OBDAI and go to connection settings
- Select “USB” as connection type
- Choose the COM port number from Step 4
- Click “Connect”

Troubleshooting USB Connections
No COM Port Appears: – Try a different USB cable (data cable, not just charging) – Use a different USB port on your computer – Check if Windows installed the driver properly
Connection Fails in OBDAI: – Verify you selected the correct COM port – Ensure the vehicle is running and adapter is powered – Check that the switch is in the UP position
Adapter Not Recognized: – Some adapters require specific drivers – Try unplugging and reconnecting the USB cable – Restart OBDAI after driver installation
USB vs Other Connection Methods
USB Advantages: – Most reliable connection – No range limitations – Fastest setup process – No pairing required – Works great for permanent installations
USB Limitations: – Requires physical cable connection – Less portable than Bluetooth – Limited by USB cable length
Professional Workshop Setup
USB ELM327 adapters are perfect for professional environments: – Stationary diagnostic stations – Reliable for repeated use – Workshop setups – No wireless interference issues
– Training environments – Consistent performance for demonstrations – Fleet maintenance – Quick, reliable connections
Key Setup Points to Remember
Essential steps for success: 1. Switch position UP for standard vehicles 2. Note the COM port in Device Manager 3. Select USB connection in OBDAI (not Bluetooth) 4. Vehicle must be running for adapter power
Pro tip: Once configured, the COM port usually stays the same, making reconnection simple for future use.
Get More Windows Tutorials
This USB ELM327 guide is part of our complete Windows setup series. Check out our other tutorials: – ELM327 Adapter Support in OBDAI – Supported connection types and compatibility boundaries – Classic Bluetooth Setup – Windows pairing walkthrough
Ready for the most reliable OBD2 connection? Download OBDAI and follow the USB setup steps above for rock-solid diagnostic performance.
Looking for other connection methods? See ELM327 Adapter Support in OBDAI for the supported adapter paths. Get OBDAI at obdai.app and experience professional-grade vehicle diagnostics.